Files
Prepare
Deploy
Troubleshooting
Related Topics
About the Example
Managed Coherence Servers provide a tight integration between WebLogic Server and Coherence, allowing for a simplified and streamlined development and management environment for distributed applications.
The functionality allows you to build an archive type, called a Grid Archive (GAR), which can be deployed and managed on WebLogic Server in a manner similar to other Java EE artifacts. Developers can now streamline their
build artifacts to generate GARs, and the operations departments can have a standardized way of deploying Coherence in the test and production environments.
This example builds a single Administration Server, configures it for Coherence, and deploys the following artifacts:
ExampleGAR.gar - A GAR containing the classes and configuration required to access Coherence.
ExampleEAR.ear - An EAR containing the preceding GAR and a WAR file with a simple application to exercise Coherence.
ExampleListenerEAR.ear - An EAR containing the preceding GAR and an EJB with a MapListener configured to listen on events in Coherence.
Files Used in the Example
Directory Location: D:\Oracle\Middleware\Oracle_Home\wlserver/samples/server/examples/src/examples/coherence/managed-coherence-servers/single-server
directory.
Prepare the Example
Prerequisites
Before working with this example, install Oracle WebLogic Server, including the examples, if you have not already done so.
Configure Oracle WebLogic Server
No special configuration is required for this example.
Build the Example
To build the example, complete the following steps:
- Open a command shell or window and navigate to the
ORACLE_HOME/wlserver/server/bin directory, where ORACLE_HOME represents the central support directory for all WebLogic products installed on a machine; for example, c:\Oracle\Middleware\Oracle_Home.
- Set your WebLogic Server environment by entering the following:
- UNIX or Linux:
. ./setWLSEnv.sh
- Windows:
setWLSEnv.cmd
- Navigate to the
D:\Oracle\Middleware\Oracle_Home\wlserver/samples/server/examples/src/examples/coherence/managed-coherence-servers/single-server
directory.
- Enter the following command to compile and package the sample to make it ready for deployment:
ant all
The preceding command creates the build directories for the example, compiles the Java source files, and packages the relevant GAR and EAR files described above.
Deploy and Run the Example
Using the command shell from which you built the example, complete the following steps:
- Enter the following command:
ant deploy
- You are prompted to confirm the creation of the domain directory. Note that if you ran the example previously, the domain directory is re-created. This directory is created in the following location:
ORACLE_HOME/user_projects/domains/single_domain
- Enter a password for the user
weblogic. (Note that the password is echoed in the command shell.)
- Enter the host name of the machine on which you are running the example. To accept the host name that is displayed, simply press Enter.
- Enter the listen port. To accept the default port 7001, simply press Enter.
The ant task automatically does the following:
- Creates a domain that contains an Administration Server only.
- Starts the Administration Server.
- Configures the Coherence cluster on the Administration Server.
- Restarts the Administration Server so that the configuration changes go into effect.
- Deploys the GAR and EAR files in the domain.
- When the ant task finishes running, text similar to the following should be displayed in the command shell:
 [wldeploy] Task 1 completed: [Deployer:149026]deploy application ExampleEAR on AdminServer.
 [wldeploy] Target state: deploy completed on Server AdminServer
 [wldeploy]
     [echo]
     [echo] Application is now deployed. To access the sample application, go to the following URL:
     [echo] http://hostname:7001/example-web-app
     [echo]
     [echo] To access the AdminServer console, go to the following URL:
     [echo] http://hostname:7001/console
     [echo]
     [echo] To shutdown the server, run "ant shutdownSingleServer" or shutdown from the Admin console.
To run the example and view the GAR deployment artifacts, complete the following steps:
- Launch a browser and enter the following URL in the address bar:
hostname:port/example-web-app
The string hostname:port corresponds to the machine host name and listen port you specified when you ran the deployment ant task.
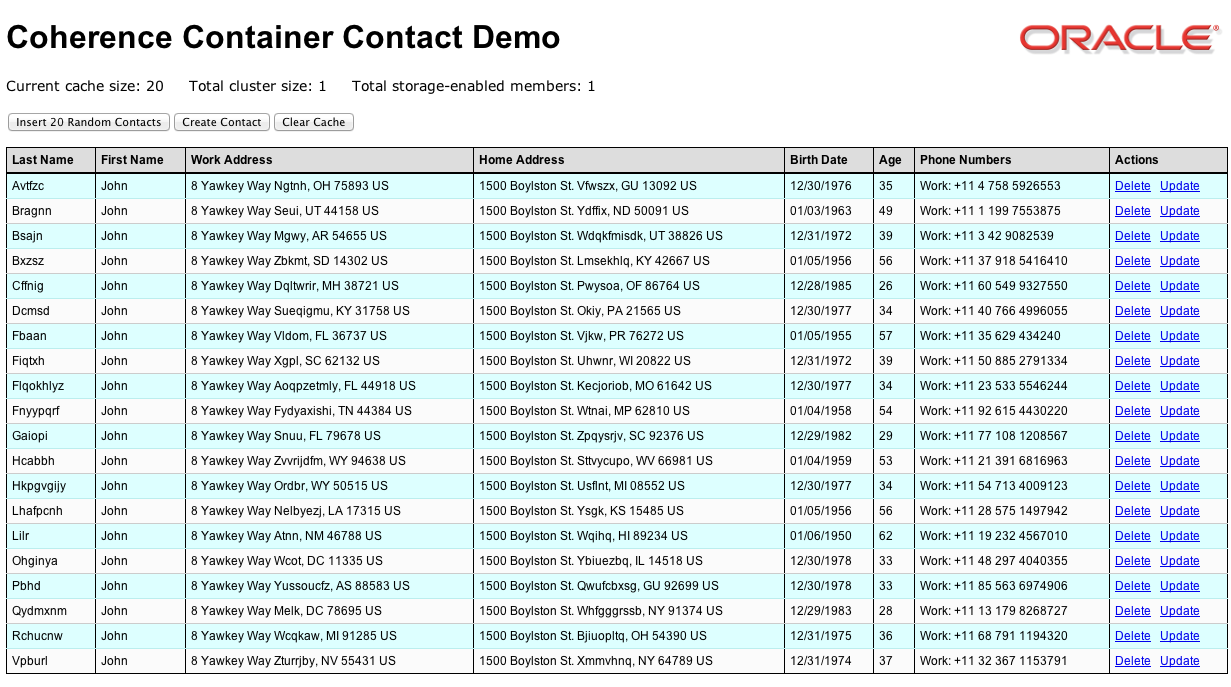
The Web application UI is displayed in the browser. This is a simple Contacts application which stores its data within a Coherence cache.
- When you first access the link you will notice that data is already loaded. This is because the postStart event has fired and has
loaded the initial data. (See the
LifecycleReactor.java class above)
You can click Insert 20 Random Contacts to insert additional contacts. The following table is then displayed in the browser.
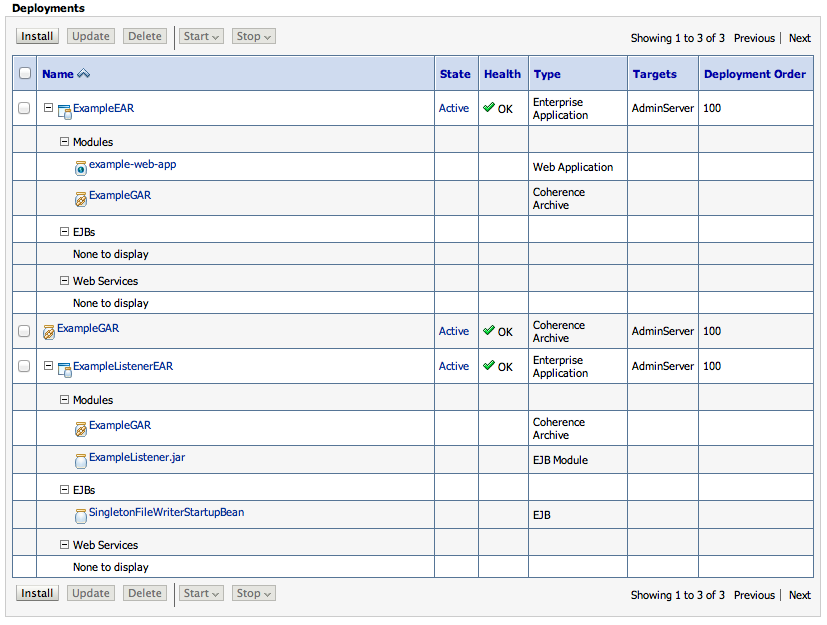
- To view the example application's deployment artifacts, launch the WebLogic Server Administration Console by entering the following URL in your browser's address bar:
hostname:port/console
- Enter the username
weblogic and the password you specified when deploying the example.
- In the Administration Console, select Deployments in the Domain Structure pane. The deployment artifacts are displayed as shown in the following figure.
Note that ExampleEAR contains two modules:
- The Coherence archive (GAR) file,
ExampleGAR
- The Web application,
WebApp
- To view the output from the EJB module, change to the
ORACLE_HOME/user_projects/domains/single_server directory in the command shell from which you deployed
the example, and view information about the changes to the data that are appended to the file ContactFileWriterListener.log.
To shut down the WebLogic Server instance in which this example is running, do one of the following:
- Using the command shell, change to the
D:\Oracle\Middleware\Oracle_Home\wlserver/samples/server/examples/src/examples/coherence/managed-coherence-servers/single-server directory and enter the following command:
ant shutdownSingleServer
- In the Administration Console:
- In the left pane of the console, expand Environment and select Servers.
- In the Servers table, click the name of the server that you want to shut down, and select Control > Start/Stop.
- In the Server Status table, select the server that you want to shut down.
- In the Shutdown drop-down menu, select Force shutdown now.
Troubleshooting
Related Topics
(Internet connection required.)
Copyright © 2012, 2020, Oracle and/or its affiliates. All rights reserved.