Files Prepare Deploy Troubleshooting Related Topics
Managed Coherence Servers provide a tight integration between Weblogic Server and Coherence, allowing for a simplified and streamlined development and management environment for distributed applications. This functionality allows you to build a new archive type called a Grid Archive, or GAR, which can be deployed and managed using standard Weblogic Server best practices. Developers can now streamline their build artifacts to generate GARs, and operations departments can have a standardized way of deploying Coherence in test and production environments.
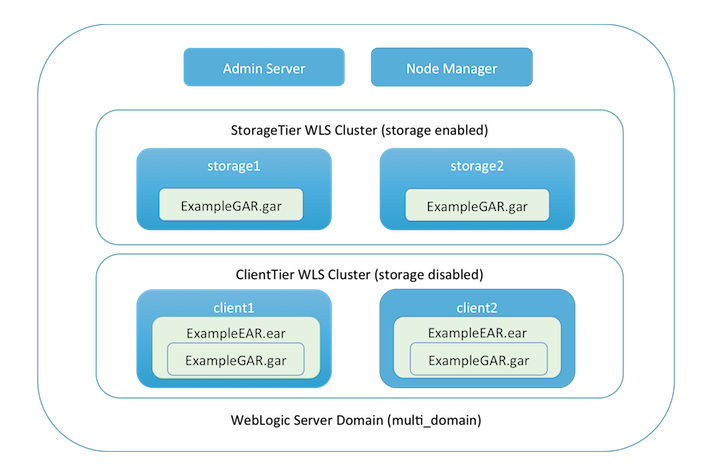
This example builds a domain consisting of an Administration Server and two WebLogic clusters, each having two Managed Servers. Coherence is configured and associated with the clusters.
StorageTier includes two Managed Servers: storage1 and storage2. This cluster is set to storage-enabled and holds data for the application.ClientTier has two Managed Servers, client1 and client2. This cluster is set to storage-disabled.The configuration of the domain created in this example is shown in the following figure.
The following artifacts are deployed in this example:
ExampleGAR.gar - A GAR containing the classes and configuration required to access Coherence. This file is deployed to StorageTier. ExampleEAR.ear - An EAR containing the preceding GAR and a WAR file with a simple application that exercises Coherence. This file is deployed to ClientTier. ExampleListenerEAR.ear - An EAR containing the preceding GAR and an EJB with a MapListener configured to listen on events in Coherence. This file is deployed to the Managed Server client1.Note: This example starts four Managed Servers and an Administration Server. A minimum of 4GB of RAM is required, and 6GB is highly recommended.
Directory Location: D:\Oracle\Middleware\Oracle_Home\wlserver/samples/server/examples/src/examples/coherence/managed-coherence-servers/multi-server
Grid Archive (GAR) Components | |
| DataGenerator.java | Class that generates random contacts. |
| Contact.java | Class that defines a contact. |
| ContactId.java | Class that defines the key for a contact. |
| Address.java | Class that defines an address for a contact. |
| PhoneNumber.java | Class that defines a contact. |
| LifecycleReactor.java | Class that defines actions that can be invoked pre/post startup and shutdown of the Managed Coherence Server. |
| coherence-application.xml | GAR-specific deployment descriptor that contains a pointer to the cache configuration and a number of optional components. |
| example-cache-config.xml | Oracle Coherence cache configuration file used in this example. |
Web Archive (WAR) Components | |
| ContactComparator.java | Comparator that orders the list of contacts. |
| ContactBean.java | Bean that holds the state of the current contacts. |
| CacheControlBean.java | Bean that holds the logic for controlling page navigation and validation. |
| ReferenceDataBean.java | Bean that holds the reference data for the application. |
| ContactList.jsp | JSF page that displays the contact list. |
| ContactDetail.jsp | JSF page that inserts or updates a contact. |
| Example.css | Stylesheet. |
| Oracle_3d_v3.jpg | Oracle Logo. |
| web.xml | web.xml file that defines the JSF mappings. |
EJB Components | |
| SingletonFileWriterStartupBean.java | EJB 3.1 singleton to be initiated on Managed Coherence Server startup to add the MapListener to the contacts cache. |
| ContactFileWriterListener.java | The MapListener called by the singleton EJB to log, insert, update, or delete events on the contacts cache in a file. |
Before working with this example, install Oracle WebLogic Server, including the examples, if you have not already done so.
No special configuration is required for this example.
To build the example, complete the following steps:
ORACLE_HOME/wlserver/server/bin directory (where ORACLE_HOME represents the central support
directory for all WebLogic products installed on your machine; for example, C:\Oracle\Middleware\Oracle_Home).
. ./setWLSEnv.shsetWLSEnv.cmdD:\Oracle\Middleware\Oracle_Home\wlserver/samples/server/examples/src/examples/coherence/managed-coherence-servers/multi-server
directory.ant allUsing the command shell from which you built the example, complete the following steps:
ant deploy ORACLE_HOME/user_projects/domains/multi_domain weblogic. (Note that the password you enter is echoed in the command shell.)ExampleGAR.gar file to the StorageTier cluster.ExampleEAR.ear file to the ClientTier cluster.ExampleListenerEAR.ear file to the client1 Managed Server.
     [echo] Application is now deployed. If you used the default ports, go to the following url to access the application:
     [echo] http://hostname:7007/example-web-app
     [echo]
     [echo] If you changed the default port, the port will be the starting port you entered (7003)+4
     [echo]
     [echo] To access the AdminServer console, go to the following URL:
     [echo] http://hostname:7001/console
     [echo]
     [echo] To shutdown the servers, run "ant shutdownMultiServer" or shutdown from the Admin console.
     [echo] You will then need to stop nodeManager.
To run the example and view the GAR deployment artifacts, complete the following steps:
hostname:port/example-web-appThe string hostname:port corresponds to the machine host name and listen port which is displayed above in the ant output.
The Web application UI is displayed in the browser. This is a simple Contacts application which stores its data within a Coherence cache.
LifecycleReactor.java class above) 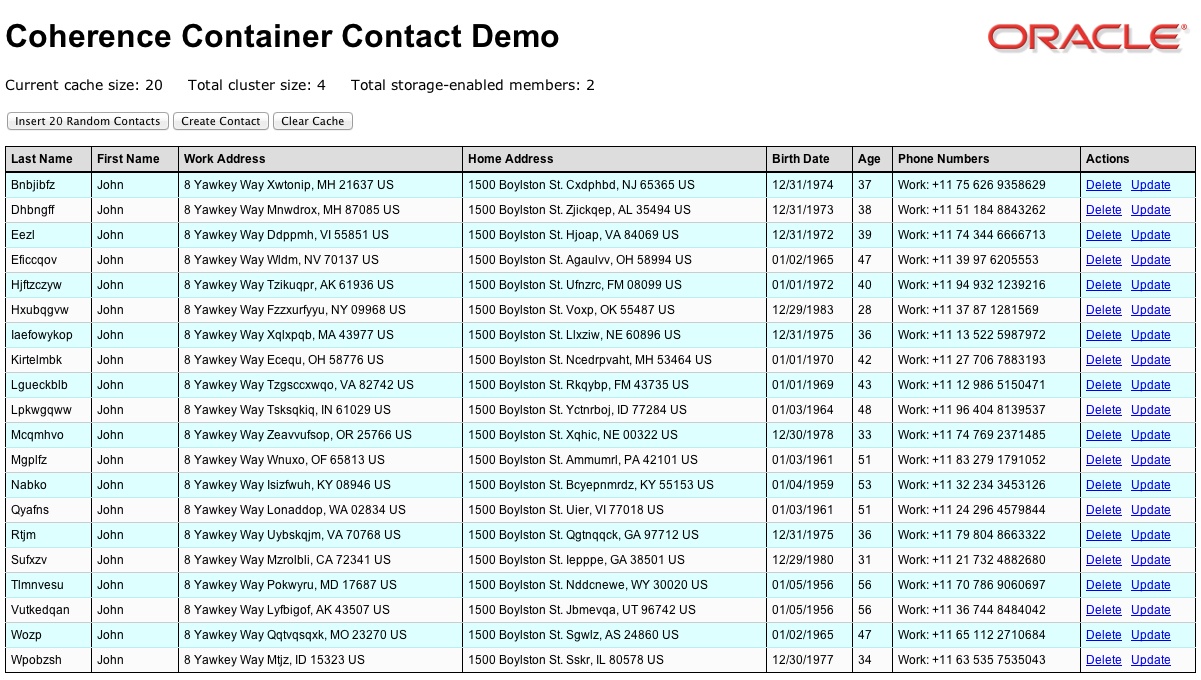
weblogic, using the password you specified earlier.ExampleEAR contains two modules: the Coherence Archive (GAR File), and the Web application.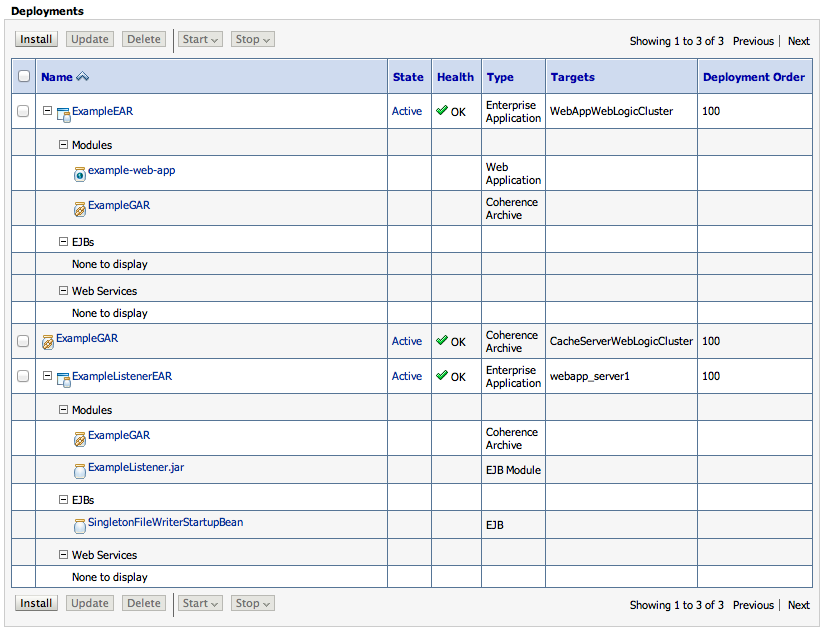
ORACLE_HOME/user_projects/domains/multi_server directory. When a change to the data occurs, information about the change is appended to the file ContactFileWriterListener.log.In WebLogic Server 12.2.1 and above, the dynamic proxy feature is set by default and this feature will automatically choose a Managed Server to host the MBean server. This means that a Managed Server will be chosen automatically to act as the management proxy and will collect and display all of the Coherence MBeans from all the members. If the current management proxy goes down, another Managed Server is chosen as the management proxy.
To connect to the management proxy, using the command shell from which you built the example, you can connect to the
the Domain Runtime MBean server. The instructions below explain how to connect
using JConsole and JVisualVM.
JConsole
The jconsole tool is a JMX-compliant graphical tool for monitoring a Java virtual machine. It can monitor both local and remote JVMs. It can also monitor and manage an application.If want to start jconsole manually, enter the JDK installation directory and then execute /bin/jconsole.exe.
service:jmx:iiop://127.0.0.1:7001/jndi/weblogic.management.mbeanservers.domainruntime
JVisualVM
JVisualVM is short for Java VisualVM. Java VisualVM is a tool that provides a visual interface for viewing detailed information about Java applications while they are running on a Java Virtual Machine (JVM), and for troubleshooting and profiling these applications. Various optional tools, including Java VisualVM, are provided with Sun's distribution of the Java Development Kit (JDK) for retrieving different types of data about running JVM software instances.If want to start manually, enter the JDK installation directory and then execute /bin/jvisualvm.exe.
service:jmx:iiop://127.0.0.1:7001/jndi/weblogic.management.mbeanservers.domainruntime
To shut down the WebLogic Server instances in which the multi-server example is running, do one of the following:
D:\Oracle\Middleware\Oracle_Home\wlserver/samples/server/examples/src/examples/coherence/managed-coherence-servers/multi-server directory and enter the following command:ant shutdownMultiServer
ant command cannot be found, ensure you have run the WL_HOME/server/bin/setWLSEnv script.weblogic.nodemanager.common.ConfigException: Native version is enabled but node manager native library could not be loaded, enter the following command prior to running the ant deploy task:export LD_LIBRARY_PATH=ORACLE_HOME/wlserver/server/native/linux/i686:$LD_LIBRARY_PATH(Internet connection required.)
Copyright © 2012,2013, Oracle and/or its affiliates. All rights reserved.